Category: Home Organization

Home organization ideas, product roundups, and storage inspiration for drawers, closets, shelves, and small spaces.

  • Step By Step Guide To Assembling Modular Drawers

    Clear Your Deck and Check the Parts

    Before you even think about clicking two pieces of plastic together, you need a clean workspace. I don’t mean a perfectly sanitized operating room, but you need enough floor space to lay everything out without tripping over your cat. Empty the drawer or the closet space completely. If you try to work around a pile of socks, you’re going to lose a screw or a small connector. It happens every time.
    Open the box and dump the hardware. Sort it. Most modular drawer kits come with a parts list. Look at it. If you are missing a cam lock or a screw, stop right now and contact the manufacturer. There is nothing more frustrating than getting 80% through a DIY modular storage guide project only to realize you are one metal pin short.
    Grab the tools. Usually, this is just a Phillips head screwdriver and maybe a rubber mallet. Some kits include a little Allen wrench. Don’t use a power drill on the highest setting; you’ll strip the screws. If you must use a drill, set the torque low. Hand-tightening is often safer for these particle board or softer plastic components.

    Assemble the Main Frame First

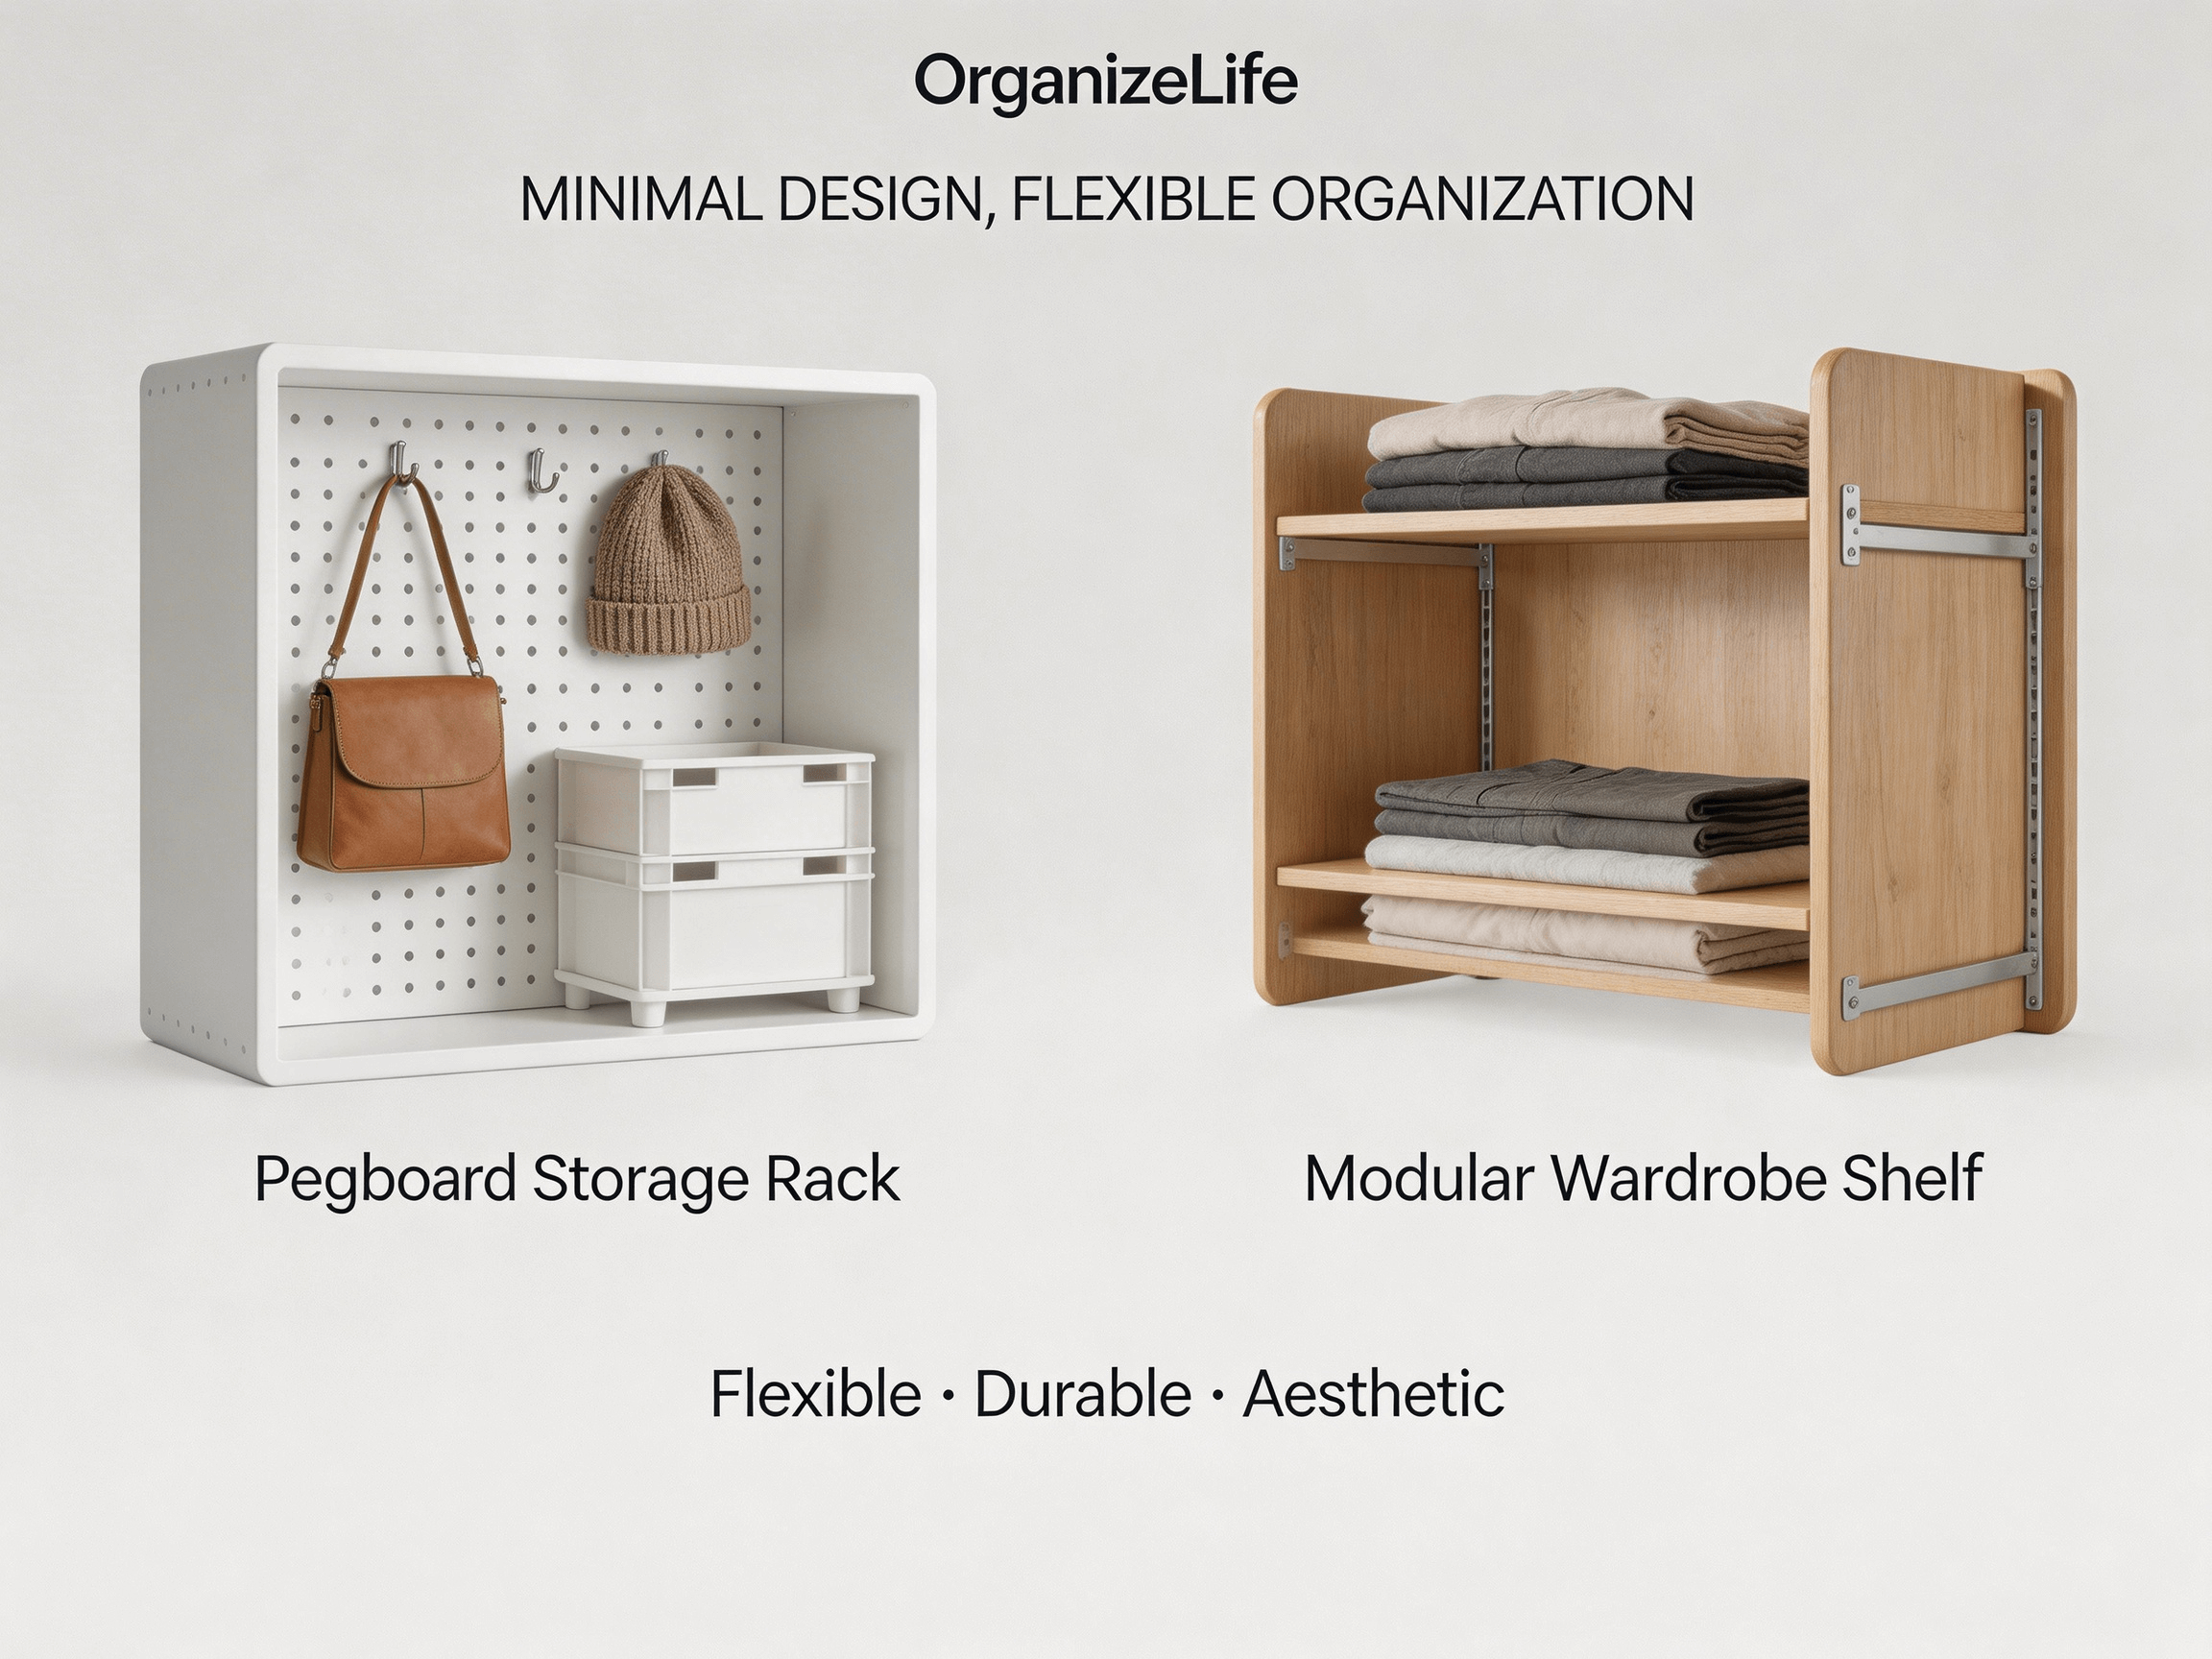
    Don’t start with the drawers. Start with the box that holds them. Whether it’s a stackable unit or a closet insert, the frame integrity is everything. If the frame is even slightly twisted, the drawers will never slide right. They will stick, jam, or just look crooked.
    Connect the vertical panels to the horizontal shelves. If you are using cam locks, turn the screw until it’s snug, but don’t beast on it. If you strip a cam lock, the whole unit becomes wobbly trash. I’ve been there; it’s not a fun moment.
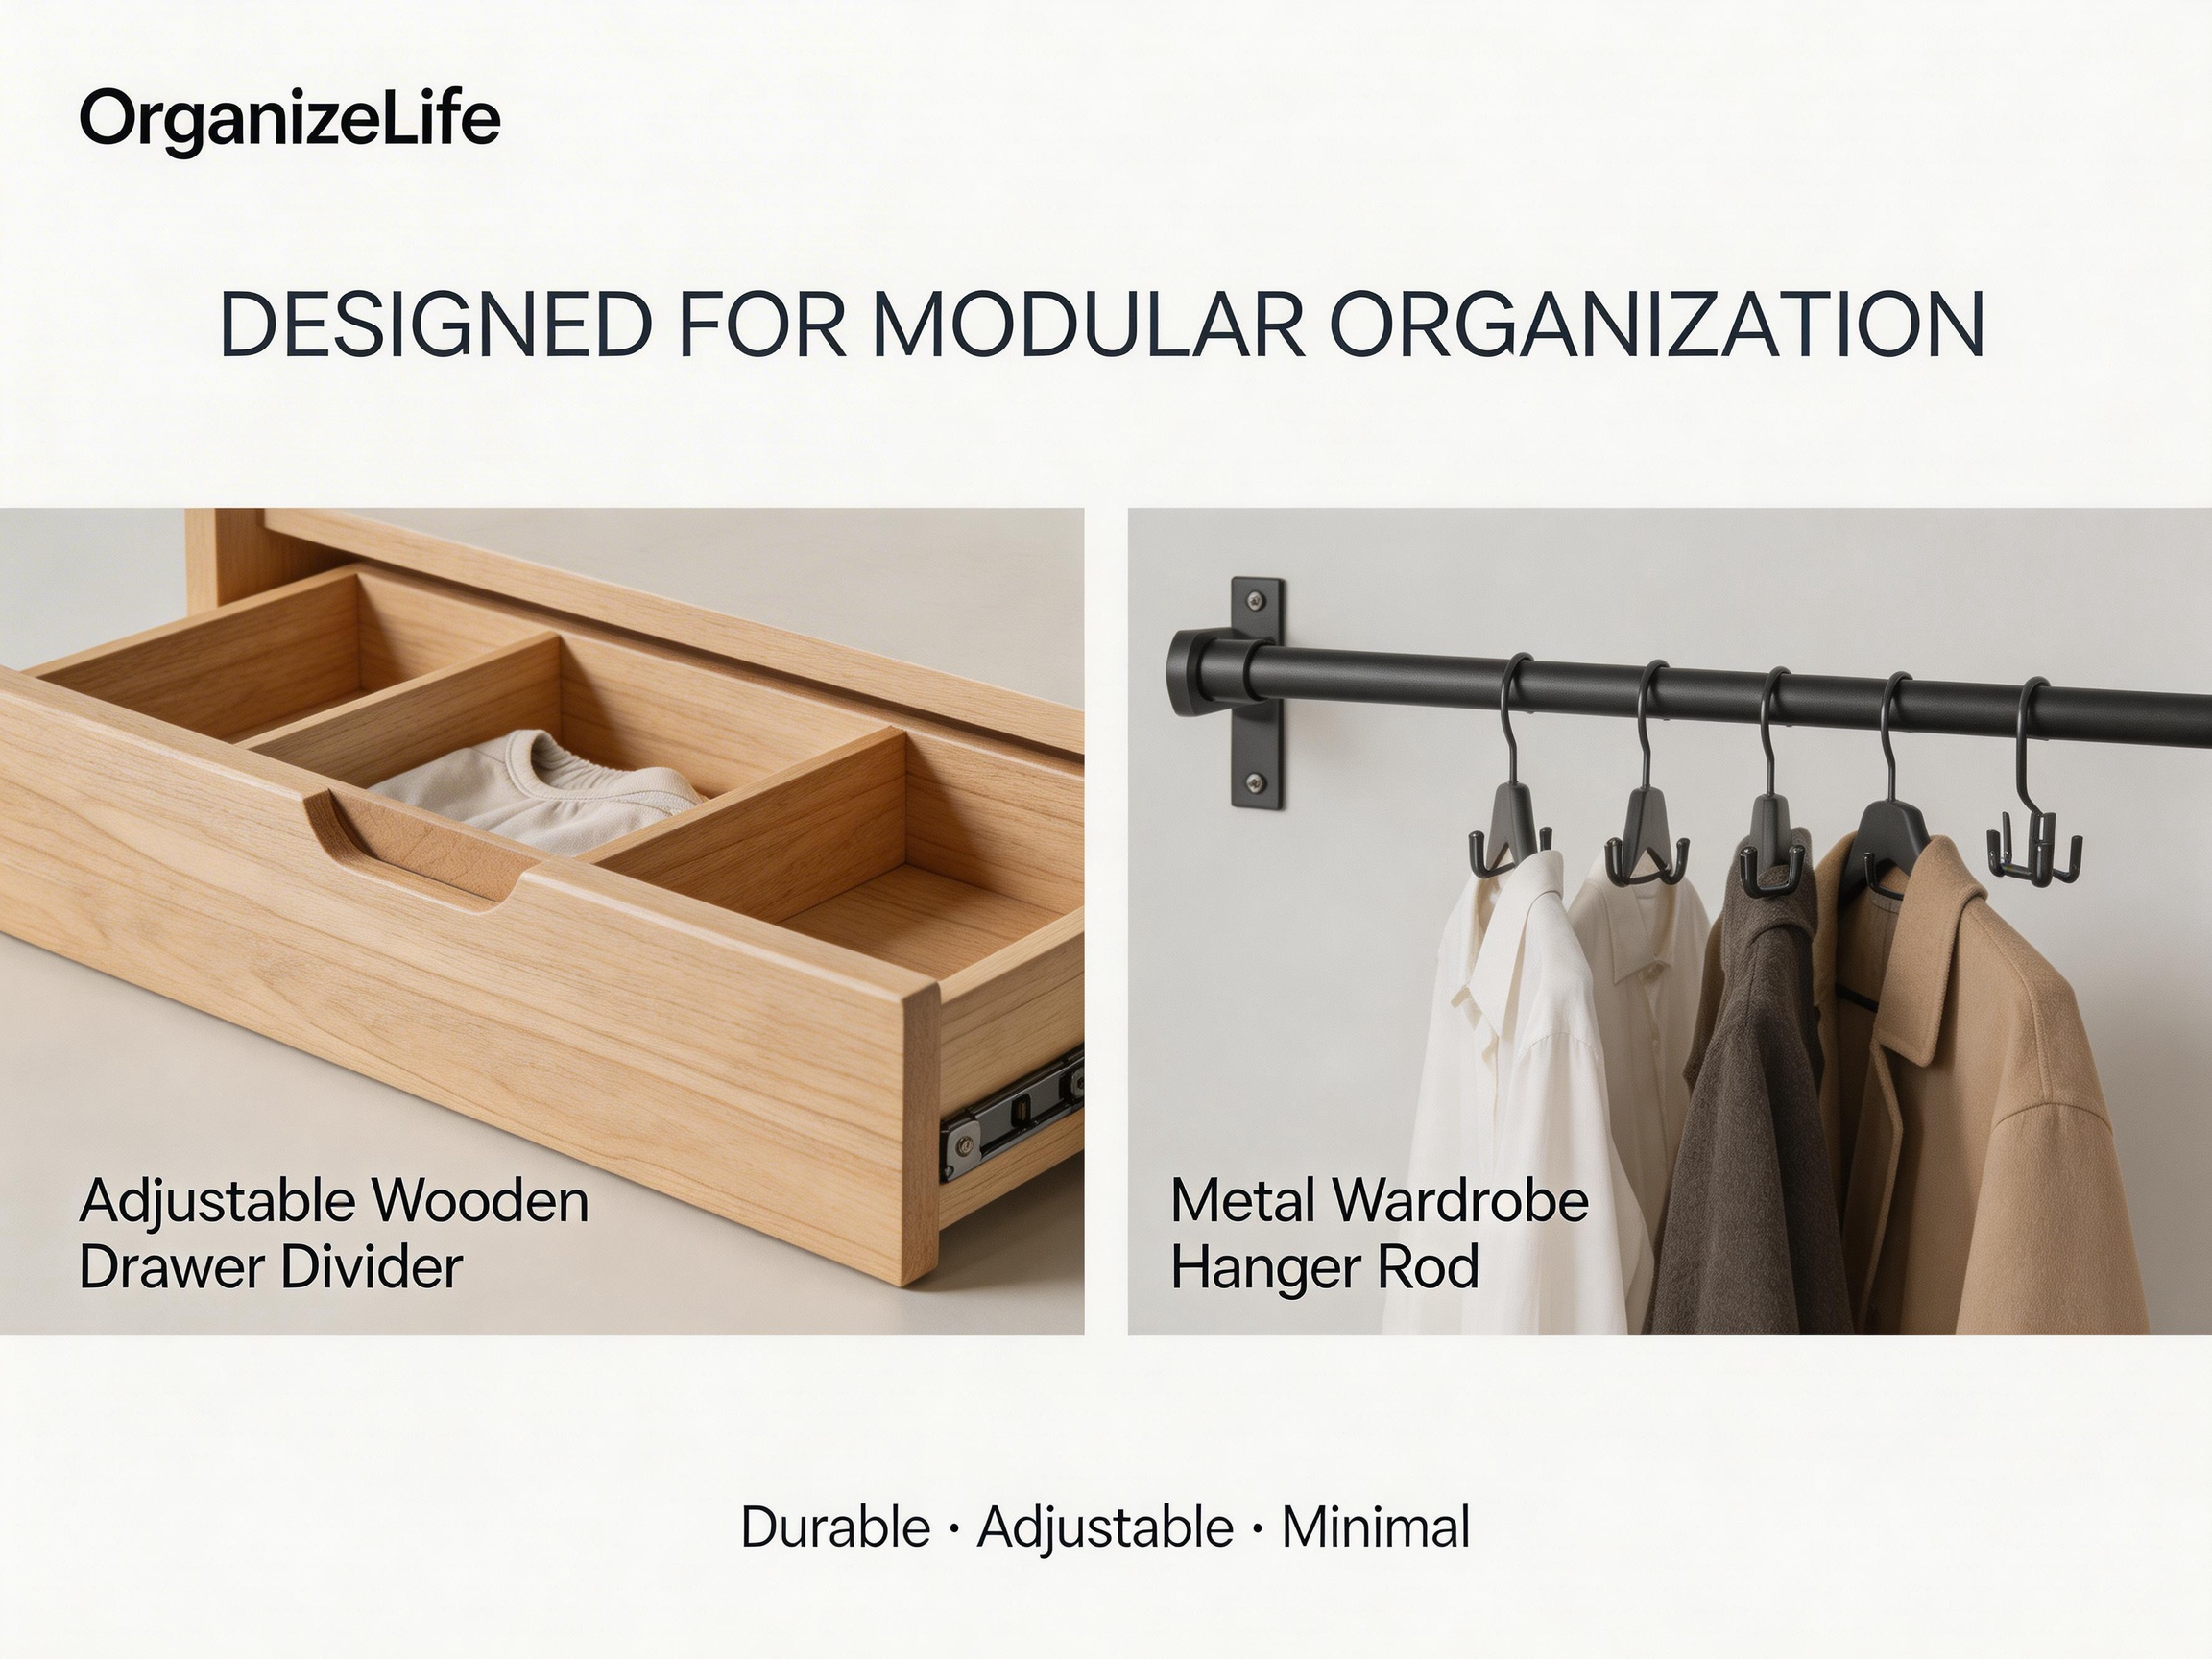
    Make sure the back panel is square. This is the step most people skip or rush. The back panel isn’t just there to keep your socks from falling out the back; it provides the structural rigidity. Use a square if you have one, or measure diagonally from corner to corner. If the measurements are the same, you’re square. If not, push the corners until they are. Then nail or screw the back panel in.

    Installing the Slide Rails

    This is the specific part of the drawer organizer installation that determines if you love or hate this product in a week. The rails need to be level and parallel.
    Most modular systems have pre-drilled holes for the rails. Stick to them. Don’t try to “eyeball” a better spot. The factory holes are there for a reason. Attach the rail to the frame first. Ensure the wheel or the ball bearing part is facing the inside where the drawer will go.
    Pay attention to the “Left” and “Right” labels on the rails. They are not interchangeable. Putting a left rail on the right side usually means the drawer won’t latch or will sit at a weird angle. I’ve made this mistake at 10 PM. It’s annoying. Check the labels twice.

    Inserting the Drawer Boxes

    Now for the satisfying part. Take the drawer box—usually just a bottom panel and four sides. Clip or screw it together depending on your specific kit. It should feel solid.
    Attach the other half of the slide rail to the sides of the drawer box. This is where precision matters. The rail needs to be flush with the front edge of the drawer. If it’s too far back, the drawer face won’t close flush against the frame. If it’s too far forward, it will hit the frame and stop.
    Line up the drawer with the rails on the frame. You usually have to angle the back of the drawer up slightly, slide the rail wheels into the tracks, and then lower the front. It should glide in smoothly. If you have to force it, something is wrong. Stop. Check the alignment. Forcing it bends the metal rails, and once they are bent, they are ruined.

    Troubleshooting the Wobble and Stick

    So, you put it all together and it wobbles. Welcome to homeownership. First, check the floor. If you have uneven tiles or hardwood, the unit might rock. Most modular kits come with little plastic adjustable feet or leveling glides. Screw them up or down until the rock stops.
    If the drawers stick, check the alignment again. Sometimes the frame gets racked during installation. Push the top corner of the frame one way and the bottom the other until the drawers slide freely. It’s a subtle movement, but it makes a huge difference.
    If the drawer drops down when you open it, the rail clip didn’t engage. You have to take it out and listen for that distinct “click” when the rail locks into the socket. It requires a bit of force. Don’t be afraid to smack it gently with the palm of your hand.

    Making It Actually Useful

    You’ve finished the physical assembly. Now, don’t just throw your stuff back in randomly. The whole point of how to assemble modular drawers is to get organized.
    Put the heaviest items—jeans, bulky sweaters, or tools—in the bottom drawers. It lowers the center of gravity and makes the whole unit more stable. Use the top drawers for lighter stuff like t-shirts or socks.
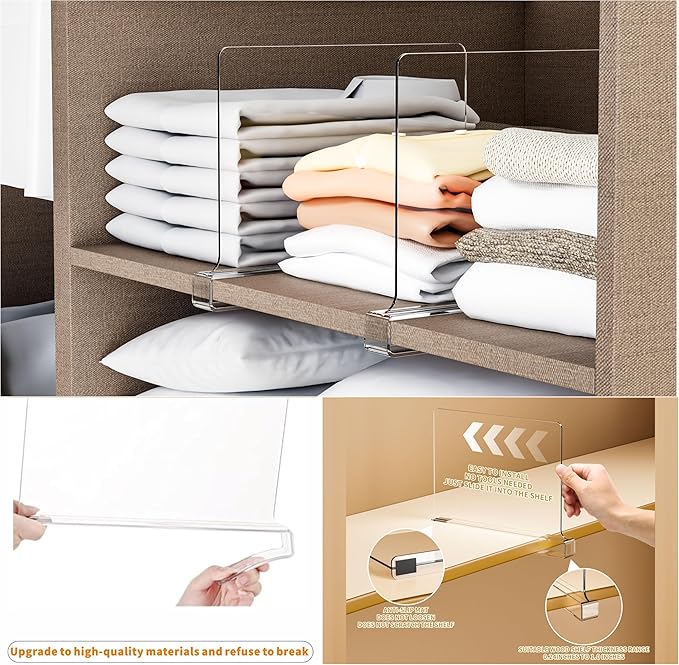
    If the kit includes dividers, use them. They prevent the “avalanche effect” where you pull out one pair of socks and the whole drawer comes with it. Adjust them as you use the unit. You might realize you need more space for underwear and less for t-shirts. That’s the beauty of modular storage; it changes with you.
    Step back. If it looks level and the drawers open with one finger, you did a good job. If not, well, take it apart and try again. It’s just screws and plastic. You’ve got this.

  • Creative Repurposing Ideas For Organizers

    Redefining Utility

    Stop reading the label. That is the first rule of creative storage. If a box says “sock drawer,” that is just a suggestion. It is plastic. It has walls. It can hold things. That is all that matters.
    I took a modular closet organizer meant for sweaters last week. It sits in my pantry now. It holds bags of chips. The dimensions are identical. The function is identical. The only difference is the packaging it came in. Once you cut that tag off, it is just a container. You limit yourself when you only buy products labeled “pantry” for the pantry and “office” for the office.
    Look at the object itself. Is it sturdy? Does it fit the space? If yes, buy it. Put it where you need it. The marketing department does not organize your house. You do.

    The Mechanism of Modularity

    Modular systems work because they break down. Most people treat these organizers as static blocks. They are not. You can cut them. You can stack them sideways.
    The plastic ribs on the side of many drawer organizers are there for structural support. Sometimes they get in the way. I use a utility knife to slice them off. It makes the box an inch wider. That inch was all I needed to fit my protein shakers. The plastic cuts clean. It leaves a rough edge, so I run a piece of sandpaper over it. Takes thirty seconds. Now it fits.
    Stacking is the other mechanism. Most closet organizers have flat tops. You can flip a drawer unit upside down and use it as a lid for a base unit. I did this under the bathroom sink. The bottom unit holds bottles. The top unit, flipped over, creates a flat surface for the soap dispenser. It doubles the storage density. No tools required. Just gravity.

    Real-World Application

    Let’s talk specifics. Abstract advice is useless. Here is where I have used these items in ways that were not intended.
    The kitchen is the easiest target. I bought a set of bamboo drawer dividers meant for silverware. I installed them in a deep drawer vertically. They act as fences now. I stand my cutting boards and baking sheets up between them. They do not slide around. I do not have to dig through a pile of wood to find the cookie sheet. It stands right there.
    In the garage, gravity is your friend. I took a modular pegboard bin set. Instead of hooking it to the wall, I screwed it into the side of a workbench. It holds screwdrivers and bits. It is off the benchtop but within arm’s reach. The plastic is thick enough to hold the weight of metal tools without sagging.
    The bathroom vanity is a mess of cords. I used a small, modular jewelry drawer. The little velvet slots were useless for my toothpaste. I pulled the velvet out. The plastic grid underneath was perfect. I threaded the electric toothbrush charger through one slot and the shaver cord through another. The cords are separated. They do not tangle. The charger stays upright.

    Avoiding Common Pitfalls

    There are wrong ways to do this. The biggest mistake is using glue. Do not glue your modular storage together.
    You will change your mind. You will move. You will buy a different sized item six months from now. If you glued the bins together, you have to throw the whole thing away or break it apart. Use zip ties if they must be secure. Use friction if they do not. Glue is permanent. Life is not.
    Another issue is overfilling. Plastic bends. If you stuff a heavy power drill into a hanging closet organizer meant for shoes, the plastic will warp. It will sag. Eventually, it rips. Know the weight limit. If the plastic feels thin and flimsy, do not put cast iron pans in it. Use it for lightweight stuff like packets of seasoning or batteries.
    Measure twice, cut once. It sounds like a cliché because it is true. I ruined a $20 bin by cutting an inch too much. It became useless. Measure the item you want to store. Measure the bin. Leave a little wiggle room.
    Measure the space. Measure the bin. Leave a little wiggle room.

  • Top 15 Amazon Modular Storage Finds to Simplify Your Space i

    What Modular Storage Actually Is

    You open the box. Inside are panels, connectors, and a bag of screws. There is no pre-assembled frame. This is the core of modular storage. It is a system you build. You decide the height, the width, and the depth. It sits somewhere between a permanent built-in and a pile of boxes. The appeal is control. You buy a kit, but you build the solution.
    On Amazon, you will find hundreds of variations. They range from simple plastic cubes that stack like Lego to heavy-duty metal racks meant for garages. The concept remains the same. You take a unit, you connect it to another unit, and you create a larger matrix. It is not magic. It is geometry. If you have a weird nook next to your fridge or a gap in your closet that standard shelves cannot fill, this is the tool for the job.

    Mechanics of Stability

    These systems rely on friction and hardware. Cheap versions use plastic clips. You slide a panel into a slot and hear a click. That click is the only thing holding your books up. It works for light items. T-shirts. Sneakers. Bedding. If you load it with hardcover encyclopedias, the plastic bows. The connectors pop out. The whole thing tilts.
    Higher-end systems use metal posts and cam locks. You insert a screw, turn a cam, and the frame tightens like a drum. This is the difference between a wobbly mess and a solid piece of furniture. When browsing the top sellers on Amazon, look at the connection points. If you see a simple plastic disc, keep the load light. If you see a bolt going through a metal sleeve, you can put heavy tools on it.
    Stability also comes from anchoring. A tall, thin tower falls over if you sneeze on it. The instructions usually include a wall strap. Use it. It is an ugly strip of nylon, but it keeps the unit from tipping. I spent an afternoon reorganizing a client’s pantry. We built a six-unit-high stack. It swayed until I drove a screw into the stud. Then it didn’t move.

    Decoding the Amazon Listings

    You will see terms like “Cube Organizer,” “Wire Shelving,” and “Stackable Bins.” They are not the same. A cube organizer is rigid. It has a fixed frame. You add fabric drawers or baskets. Wire shelving is open. It allows air flow. Stackable bins are individual boxes that lock together.
    Do not trust the weight limits listed in the bullet points without skepticism. Manufacturers test under perfect conditions. They distribute weight evenly. In a real home, you stack heavy pots on one shelf and leave the other empty. The unit twists. If a listing claims 50 pounds per shelf, assume 30. It leaves a margin for error.
    Look at the particle board thickness. 12mm board bends. 15mm holds its shape. Metal gauge matters too. Lower gauge numbers mean thicker steel. A 0.8mm post is stiff. A 0.6mm post flexes. Read the specifications. Ignore the marketing fluff about “revolutionary design.” Focus on the material dimensions.

    Where These Systems Work Best

    The garage is the easiest win. Concrete floors are uneven. Modular wire racks adjust in one-inch increments. You can level the shelves even if the floor slants. I installed a set of heavy-duty metal racks last month. The foundation was a mess. The adjustable feet compensated for the slope. The shelves held paint cans, storage bins, and camping gear without wobbling.
    Kitchens are trickier. You need food-safe materials. Open wire racks collect dust. You have to wash the cans before you use them.在这里, sealed plastic bins or solid wood cubes work better. Pantries often have vertical space that goes unused. A tall, narrow modular tower can turn that dead air into storage for spices and snacks.
    Closets benefit from the cube style. You can fold jeans and stack them in the cubes. It looks neater than a pile. Shoes fit well in the wire units. The dirt falls through to the floor. You sweep it out later. Do not use these units for fine clothing. Moths get in. Dust settles. Use them for utility items. Gym clothes. Socks. Winter gear.

    Assembly Pitfalls

    The most common mistake is rushing. People try to snap the pieces together without checking the alignment. The frame ends up skewed. The drawers do not slide in. You have to take it apart and start over.
    Lay everything out first. Sort the panels. Sort the connectors. Make sure you have all the parts. It is frustrating to get halfway through and realize a piece is missing. Amazon reviews are full of complaints about missing hardware. Check the box before you begin.
    Use a rubber mallet. If you try to force plastic connectors with your palm, you will hurt your hand. A gentle tap seats the parts properly. Do not use a steel hammer. You will crack the plastic. If the instructions say to pre-drill holes, do it. Driving a screw into particle board without a pilot hole splits the wood. The screw pulls out. The shelf falls.
    Finally, think about access. Do not build a unit so high you cannot reach the top shelf. Do not put a heavy bin on the bottom if you need to move it to get to the bin behind it. Plan the layout based on how you use the items. Daily stuff goes at waist height. Seasonal stuff goes up high or down low.

  • 5 Smart Storage Solutions Under $20 for a Clutter-Free Bedro

    The Reality of Bedroom Clutter

    Clutter isn’t just messy. It is physical friction. You wake up, step on a book, and your day starts with a limp. You look for a specific shirt, find three others you don’t wear, and get dressed five minutes late. Most storage advice tells you to buy expensive systems or hire a professional organizer. That ignores the actual problem. You just need the stuff off the floor. You need to breathe. The goal here isn’t a magazine cover room. It is a functional space where you can walk barefoot without fear.

    How Low-Cost Storage Actually Works

    Cheap storage relies on geometry, not premium materials. It is about using the “dead” space in a room. The air under your bed. The vertical space behind your door. The gap between your hanging shirts and the closet floor. High-end solutions use custom carpentry to hide these spaces. Low-cost solutions use standardized shapes to fill them. A plastic bin is a cube. It defines boundaries. When things have boundaries, they stop sprawling. It is simple physics. You contain the volume, you contain the mess.

    What to Look For Under $20

    When you are spending less than twenty bucks, you are paying for utility, not luxury. Do not expect solid wood or soft-close hinges. Look for thick plastic. If you squeeze the side of a bin and it buckles immediately, walk away. Check the zippers on fabric bags. If the teeth look like cheap plastic, they will jam the first time you overstuff it. Measure your space before you leave the house. A $15 organizer that doesn’t fit your closet rod is just clutter itself. Bring a tape measure. It is the most important tool you own.

    Five Solutions That Actually Work

    1. Vacuum Storage Bags
    These are the heavy hitters for seasonal clothes. You throw in your winter coats, seal the valve, and suck the air out with a handheld pump. The bag shrinks. It becomes a hard, flat slab. You can stack four of them in the space one bulky coat used to take. It is satisfying to watch. Just be careful with sharp zippers or buttons; they can puncture the plastic if you cram them in too hard.
    2. Under-Bed Rolling Bins
    Clear plastic bins with wheels on one end. You lift the bed skirt, slide the bin in, and forget about it. The clear plastic is crucial. You want to see what is inside without pulling it out. Look for lids that snap tight. Dust bunnies under the bed are real, and they get into everything. These bins keep your spare blankets safe and dry.
    3. Over-the-Door Shoe Organizer
    Do not use this for shoes. It is a trap. The pockets sag, and the shoes get dirty. Use it for everything else. Socks, charging cables, batteries, toiletries, mail. It hangs on the back of your bedroom door, taking up zero floor space. You can see everything at a glance. It turns a blank door into a vertical wall of drawers.
    4. Velvet Non-Slip Hangers
    They are thin, so you fit three shirts in the space of one plastic tubular hanger. The velvet texture grabs the fabric. Wide-neck sweaters stay on the rod. They look uniform, which makes the closet look calmer. Buy a box of twenty. Replace the mismatched wire hangers one by one. It makes a surprising difference in how much room you have.
    5. Bedside Caddy
    If you do not have a nightstand, or if your nightstand is a pile of books, get a caddy. It slips between the mattress and the box spring. It has pockets for your phone, glasses, book, and water bottle. It hangs there. When you wake up, your phone is right where you left it. No knocking glasses off the floor in the dark.

    The Mistake of Buying First

    There is a trap people fall into. They buy the bins, they buy the bags, and they fill them up. The room is still messy. They just hid the mess inside plastic containers. You have to edit before you organize. If you haven’t worn it in two years, donate it. If it is broken, throw it out. Storage solutions are for things you actually use or need to keep. They are not coffins for garbage. Be ruthless. The less you own, the less you have to store.

  • 7 Life-Changing Closet Organizers You Didn’t Know You Needed

    Vertical Shelf Dividers for Stacking Chaos

    Stacking sweaters or jeans on open shelves often turns into a game of Jenga. You pull one item out, and the whole pile collapses. Vertical shelf dividers fix this specific problem without requiring a total closet overhaul. These are typically acrylic or metal boards that sit on your shelf and clip onto the wire rack or sit flush against a solid wood surface. I tested a set of clear acrylic ones that are 12 inches deep, which fits most standard wire shelving units perfectly. They create individual “bins” for your stacks, keeping everything upright.
    Installation is usually tool-free. You just slide the clip under the shelf wire or screw the base into a wooden shelf. It takes about five minutes to set up four dividers. The visibility is great because acrylic is clear, so you can still see what’s behind the stack. Just be careful with heavy items. If you stack 20 heavy denim jeans in one section, a lightweight plastic divider might bow. Stick to the metal versions for heavy loads. They turn a messy pile into a neat wall of fabric instantly.

    Cascading Hangers for Horizontal Space

    If your closet rod is packed tight, you are wasting vertical space. Cascading hangers, also known as wonder hangers, let you drop a second hanger from the first one. It’s a simple concept—hooks on the top of the hanger hold the neck of another hanger below it. I use these for tank tops and t-shirts. Instead of taking up 12 inches of horizontal rod space for five shirts, they might only take 4 inches.
    There are two main types: metal rings and plastic tabs with hooks. The metal rings are more durable but can be noisy if they bang together. The plastic ones are rubberized and quiet, which I prefer. They usually hold about 5 to 6 pounds per hook. Don’t overload them with heavy winter coats; the plastic can warp. For light clothing, they effectively double your hanging capacity. It takes a bit of getting used to the motion of lifting the bottom shirt to unhook it, but the space savings are worth the minor inconvenience.

    Vacuum Storage Bags for Seasonal Rotation

    Bulky items like winter coats, comforters, and extra pillows eat up massive amounts of real estate. Vacuum storage bags are the only practical way to shrink these down. You stuff the bag, seal the zipper, and suck the air out with a vacuum hose. I managed to compress a king-sized down comforter into a 2-inch thick slab. It saves about 75% of the volume.
    The key here is the valve. Cheap bags have valves that clog or don’t hold a seal. Look for “double-zip” seals and a one-way valve cap. I used a standard household vacuum (a Dyson) and it worked fine, though some brands include a manual hand pump if you don’t have electricity nearby. Just be warned: feathers can poke through the fabric and puncture the bag. It’s smart to wrap sharp items or put them inside a pillowcase first. Also, once sealed, the clothes will be very wrinkly. You’ll need to steam or wash them before wearing again.

    Non-Slip Velvet Hangers

    Wire hangers from the dry cleaner are the enemy of organization. They slide around, get tangled, and leave shoulder bumps. Non-slip velvet hangers solve the sliding issue completely. The texture grabs onto the fabric of your shirt or dress, keeping it in place. They are incredibly thin, about 0.2 inches thick, compared to the bulky plastic tubular hangers.
    I replaced my entire closet with these last year. The visual uniformity makes the closet look bigger and calmer. They come with notches for camisoles and thin straps, which is a detail I didn’t know I needed until I had it. You can hang a silk top without it sliding off onto the floor. The only downside is durability. If you try to hang a heavy soaking-wet winter coat on the plastic hook, it might snap under the weight. For daily wear though, they are the standard for a reason.

    Pull-Out Wire Baskets for Deep Shelves

    Most closets have that one deep, dark shelf above the hanging rod where things go to die. You toss a shoebox or a bag up there, and it disappears. Pull-out wire baskets turn that dead space into usable storage. These are wire mesh baskets on sliding rails that mount to the shelf or the closet wall.
    I installed two 24-inch wide baskets. The sliding mechanism is ball-bearing, so it rolls smoothly even when full of heavy jeans. The wire mesh lets you see what’s inside, which is crucial. You don’t want to have to pull every basket down to find your gym shorts. Installation requires a drill and a level, but it’s a straightforward 20-minute job. Make sure to measure the vertical clearance above your shelf. If you have a low clearance, the handles on the basket might hit the ceiling when you pull them out. Low-profile baskets exist for exactly this scenario.

    Expandable Drawer Dividers

    Junk drawers are a universal problem. Socks mixed with chargers, underwear tangled with gym shorts. Expandable drawer dividers use spring-loaded tension to stay put inside a drawer. You push them out until they wedge tight against the drawer sides.
    I use bamboo ones because they look nicer than plastic. They are adjustable from about 11 inches to 17 inches, fitting most dresser drawers. You can create custom compartments—say, a 4-inch slot for socks, a 6-inch slot for t-shirts, and a 3-inch slot for underwear. It forces you to keep things organized because there is literally no room for clutter to spill over. One thing to note: if your drawer slides are very rough, the vibration from opening and closing the drawer can cause the dividers to slowly walk backward. Checking the tension once a month keeps them snug.

    Over-the-Door Hooks and Racks

    The back of the closet door is prime real estate that often goes unused. An over-the-door rack with metal hooks can hold robes, pajamas, or the clothes you plan to wear again tomorrow. It’s better than the “chair” pile we all tend to accumulate.
    Look for a rack with padded brackets. If the metal touches the door directly, it can scratch the paint or rattle every time you close the door. I use a model with six double hooks. It holds about 10 pounds per hook easily. It’s perfect for hanging wet towels to dry or keeping your work bag accessible. Just be careful with the door clearance. If your closet door has a tight fit against the frame when closed, a thick over-the-door hook might prevent the door from latching properly. Measure the gap between your door and the frame before buying; you usually need at least 0.2 inches of clearance.

  • The Ultimate 10-Piece Modular Drawer System for Small Apartm

    What Modular Actually Means

    Let’s be clear about what we are talking about here. A modular drawer system isn’t just a dresser. It’s a bunch of separate boxes that you stack on top of each other to build a tower. You get ten pieces in the box. You could arrange them as two short rows of five, one tall column of ten, or a weird staircase shape if that’s what fits your corner.
    I honestly don’t know why standard furniture design insists on giant, heavy single units. Once you buy a traditional dresser, you’re stuck with it. You can’t make it shorter to fit under a window, and you can’t make it taller if you get more stuff. With a 10-piece modular set, the configuration is entirely up to you. It’s like LEGOs for your socks.

    How the Stacking Mechanism Works

    You might worry about the stack falling over. That is a valid fear. The good systems use a simple interlocking design. The bottom of one drawer has a groove, and the top of the one below it has a corresponding lip. You drop it in, and it clicks or sits securely.
    There are no screws, no drills, and no Allen wrenches that strip out halfway through the job. Gravity does most of the work. Some higher-end sets include connecting pins or clamps if you plan on building the tower to the ceiling, but for standard apartment use, the friction fit is usually enough. It makes moving day significantly less painful. You unstack the units, carry them one by one, and reassemble them in the new place. No hernia required.

    Sizing and Configuration

    A “10-piece” set usually implies a mix of drawer sizes. You rarely get ten identical boxes because that’s not practical for how humans actually store things. You typically get a split between deep drawers and shallow drawers.
    The deep ones are for bulky items. Jeans, sweatshirts, winter coats. The shallow ones are for the stuff that disappears if you throw it into a deep cavern—t-shirts, undergarments, accessories. When you are setting yours up, put the heavy stuff at the bottom. It lowers the center of gravity. It makes the whole tower more stable and keeps you from having to bend down to the floor to dig out a pair of socks.
    I’ve found that splitting the system into two separate columns works better than one massive tower in small rooms. One column by the bed for nightstand stuff, one in the closet for clothes. It breaks up the visual weight of the furniture so the room doesn’t feel like it’s dominated by a wall of plastic or wood.

    Making the Most of Small Spaces

    The biggest enemy in a small apartment is dead space. That’s the six-inch gap between the top of your dresser and the ceiling. Or the awkward corner next to the fridge that is too small for a bookshelf but big enough to collect dust bunnies.
    Because these units are modular, they fill those gaps. You can stack them to the exact height of the window sill, creating a bench. Or you can run a row along the top of a desk to hide office clutter.
    In a studio apartment, these systems can act as room dividers. If you face the drawers both ways—some accessible from the living area, some from the sleeping area—you create a visual barrier without blocking light. It’s not a permanent wall, but it tricks the brain into thinking there are two distinct zones. Just make sure you anchor anything over three feet high. You don’t want it tipping over during a minor earthquake or just because you slammed a drawer too hard.

    Stability and Safety Concerns

    Speaking of tipping, let’s address the elephant in the room. These things are heavy when full. If you stack all ten pieces in a single column, that’s a lot of weight resting on a small footprint.
    Most kits come with wall brackets. Use them. I know it’s annoying to put holes in the wall, especially if you are renting. But drywall repair is cheaper than a broken toe or a crushed laptop. If your landlord is strict about holes, use the heavy-duty removable adhesive strips. They work surprisingly well if you follow the instructions and clean the wall with alcohol first.
    Another issue is overloading the drawers. It’s tempting to treat the bottom drawer like a junk trunk, but if you put fifty pounds of books in there, the frame might warp. Stick to clothes and soft goods. If you need to store heavy equipment, look for a system with reinforced steel bottoms rather than plastic or thin particleboard.

    Common Pitfalls to Avoid

    Don’t buy the cheapest option you find online. The materials matter. Flimsy plastic will bow after a month, and the drawers will start sticking when you try to pull them out. Look for thick, high-density polyethylene or sturdy MDF with a melamine finish.
    Also, avoid the urge to mix and match different brands. Brand A’s dimensions might be just slightly off from Brand B’s. Your tower will look lopsided, and the stacking mechanism won’t lock correctly. Stick to one set so everything lines up perfectly.
    Finally, think about the handles. Some integrated handles are too small to get a good grip, especially if your hands are full. Look for wide, recessed channels or simple metal pulls that feel solid to the touch. It sounds minor, but you will touch those handles thousands of times. You want them to feel good.

  • 10 Best Modular Drawer Organizers That Will Transform Your C

    What Modular Actually Means

    Modular is a buzzword. In the context of drawer organizers, it simply means the parts are not permanently glued together. You get a set of bins or dividers that you arrange like a puzzle. If your sock collection shrinks or you buy more ties, you change the layout. Fixed trays are a gamble. Once they are in, you are stuck with that grid until you buy a new one. Modular systems let you adapt without throwing everything away.

    How the Connections Hold

    The weak point of any modular system is the connection. Cheap organizers rely on friction or tiny plastic tabs. You pull out one t-shirt and the whole divider lifts up with it. Look for interlocking slots. The slots should run deep into the material. I tested a set last week where the sides just rested against each other. They slid apart within an hour. The best designs have a “click” or a tight fit that requires a firm push to separate. You want it to stay put when you slam the drawer shut.

    Material and Grip

    Plastic cracks. Bamboo warps if it gets damp. Acrylic scratches. There is no perfect material, only trade-offs. Thin plastic feels flimsy. It bends when you push down on it. Bamboo has a nice weight and looks clean, but it costs more. Acrylic is sleek but shows every fingerprint and speck of dust. The critical part is the bottom. Smooth plastic slides around like a hockey puck on ice. You need texture or silicone pads. If the organizer shifts every time you open the drawer, you will stop using it.

    Measuring Your Space

    Don’t eyeball it. Grab a tape measure. You need the interior length, width, and depth of the drawer. Then subtract half an inch. You need wiggle room. If the organizer is exactly the same size as the drawer, you will never get it in. I have seen people force trays in only to realize they can’t close the drawer. Also, check the diagonal. If your drawer is deep but the opening is narrow, a large assembled tray might not fit through the top.

    The Folding Reality

    Dividers do not fold clothes for you. This is the biggest misconception. If you throw a pile of messy laundry into a modular grid, you just have a contained mess. You still have to fold. Flat folding works best for rigid dividers. Rolling works better for open bins. The organizer just maintains the order you create. It takes effort to set up. You have to decide if the time saved searching for socks is worth the time spent folding them.

  • How One Family Maximized a Small Reach In Closet Space

    How One Family Maximized a Small Reach In Closet Space

    The Reality of a 6-Foot Reach-In

    Let’s be honest. Most standard reach-in closets are terrible. They are designed by people who clearly don’t own clothes. The family in this case study—I’ll call them the Millers—had a classic problem. A standard 6-foot wide space with one high bar and one useless shelf. That’s it. Every morning was a frantic struggle. Shoes were piled up in a corner that looked like a landslide waiting to happen. They tried plastic bins. They tried hanging organizers that just ripped off the door. Nothing worked. It felt chaotic. They weren’t looking for a luxury showroom; they just wanted to find their matching socks without a meltdown.

    Ditching the Single Rod

    The first thing we did was ignore the original setup. That single rod running the width of the closet is the enemy of efficient small closet solutions. We ripped it out. The goal wasn’t just to “tidy up”; it was to double the usable surface area. We decided on a modular organizer system. Why? Because if they move, the system moves with them. It’s not built into the drywall. It’s practical. It gives you options.

    Building the Vertical Core

    We installed a vertical tower of drawers right in the center. This is the game changer for a reach in closet makeover. It splits the space but creates a “home” for folded stuff—jeans, t-shirts, stuff that doesn’t need to hang. By putting drawers in the middle, you gain hanging space on both sides. Short hanging on one side (shirts, folded pants), long hanging on the other (dresses, coats). It sounds obvious, but you’d be surprised how many people just stack plastic bins on the floor and call it a day. The drawers slide smoothly. No more yanking a bin out from the bottom of a pile and having everything collapse on top of you.

    The “Almost” Mistake

    They almost made a huge error. They were about to buy a custom built-in system. It looked beautiful in the catalog. But it was expensive and permanent. If their kids grew two inches, the system couldn’t change with them. That’s the beauty of this modular organizer case study: flexibility. We used adjustable shelving brackets alongside the drawers. This means in two years, when the winter coats need more room, they can move a shelf up in about thirty seconds. No drills, no dust. Just a simple adjustment. That’s the value you’re actually paying for—not just the white wire or the finish, but the ability to change your mind later.

    The Morning Result

    It’s not magic. It’s just geometry. The closet holds 30% more clothes now. The floor is visible. The husband told me he actually enjoys looking for socks now, which is a sentence I never thought I’d hear. They spent a Saturday afternoon on it. It wasn’t free, but it costs a lot less than moving to a bigger house just for closet space. The system works because it fits their specific mess, not some idealized version of it.

  • Free Printable Checklist for Your Modular Organizer Shopping Trip

    Free Printable Checklist for Your Modular Organizer Shopping Trip

    What This Checklist Actually Covers

    A modular organizer shopping trip goes sideways in predictable ways. You buy bins that don’t fit the shelf depth. You forget the one weird corner. You get home and realize you measured with the tape at an angle.
    This closet organizer checklist is built around three things you can verify with your hands.

    • Space facts you can measure and re-check
    • Stuff facts you can count and touch
    • Hardware facts you can match to the system you’re buying
      Before you print anything, walk to the closet and do one small action. Open the door, pull one drawer all the way out, then shut it. If the drawer rubs, if the door swings into a hamper, if the baseboard sticks out, write that down. Those little frictions decide what “modular” will actually work in your room.
      Core pieces to plan for when you’re looking at Modular Drawer & Closet Organizers.
    • Drawer units or cube frames
    • Bins, dividers, and trays
    • Labels
    • Mounting or anchoring parts if the unit needs them
    • “In-between” items you forget, like shelf liners or drawer stops
      Not glamorous. Practical. That is the point.

    How Modular Systems Win or Lose in Real Life

    Modular organizers feel flexible because you can stack and swap parts. In practice, they behave more like a set of fixed limits.
    Here’s what changes everything.

    • Depth decides whether hangers clear the back wall and whether drawers can open fully. Put your tape measure on the side wall, press it flat with your thumb, and read the number without leaning in.
    • Door swing decides whether you can access bins without doing a side-step every morning. Stand where you normally stand and open the door with one finger. Watch what it hits.
    • Vertical clearance decides whether stacking is real or just a picture on a box. Reach up and feel for the top shelf lip or the closet rod bracket.
      Modular drawer systems also have their own “math.” A bin might fit the width but still fail because the drawer sides taper or because the handle steals space. If you can, bring one example container from home. A small one is enough. Set it inside the display drawer in the store and slide the drawer closed. If it catches, you learned something before you bought a whole set.
      One more action that saves time later. Take two photos.
    • One photo of the empty closet, taken straight on.
    • One photo of the mess pile you’re trying to control, taken from above.
      Those photos turn your shopping trip into a matching exercise instead of a vibe-based purchase.

    Fit and Feature Checks While You Shop

    In the store, your brain will lie to you. Everything looks like it will fit because it is sitting in open air. Use a short routine.
    Touch the materials. Then do a simple stress check.

    • Grab a drawer front and pull. Not gently. If it flexes, notice where it bends.
    • Press down on a shelf panel with your palm. If it bows when you lean a little weight, it will bow more under stacked jeans.
    • Twist a bin corner with two hands. If it squeaks like crazy, you may still buy it, but you will hear that squeak at 6 a.m.
      Look for these make-or-break details.
    • Drawer stops that keep you from pulling the whole drawer into your lap
    • Adjustable dividers that lock in place, not just “float”
    • Label surfaces that actually accept a sticker without peeling
    • Feet or levelers if your closet floor is uneven, many are
      Bring your measurements out in the open. Pull out your phone, open Notes, and compare line by line. This is where a modular storage shopping list helps, because it keeps you from buying the “almost right” piece just to end the decision.
      If you only do one store test, do this. Put your hand on the bottom of a display bin and rub your thumb across it. If the plastic edge is sharp, it can snag delicate fabric. If it is rough, it will collect dust faster. Not a dealbreaker, just information.

    The Printable Checklist You Can Take Along

    Print this, or copy it into your notes app. It’s designed to be a one-page tool. If you want it cleaner, paste into a doc and print at 90 percent.
    This is one of those printable organization tools that earns its keep because it forces you to slow down for thirty seconds.
    A. Closet and Room Measurements

    • ___ Closet interior width
    • ___ Closet interior depth
    • ___ Floor to underside of top shelf
    • ___ Floor to closet rod
    • ___ Door swing clearance, where the door stops
    • ___ Baseboard depth, measure how far it sticks out
    • ___ Any obstructions you can touch, outlets, vents, brackets
      Action in the aisle. Put your tape on a shelf sample and practice reading it fast. Sounds dumb. It’s how you avoid transposing numbers later.
      B. What You’re Storing, Quick Counts
    • ___ Hanging shirts count
    • ___ Hanging pants count
    • ___ Dresses or long items count
    • ___ Folded items stacks, jeans, tees, sweaters
    • ___ Socks and underwear, estimate by “loads” if you don’t want to count
    • ___ Accessories, belts, hats, bags
    • ___ Shoes pairs, include the ones by the door
      Action at home before you leave. Grab one laundry basket, dump it on the bed, and sort into three piles. Hang, fold, toss. You’ll shop differently.
      C. Modular Pieces to Compare in Store
    • ___ Drawer unit width and depth matches space
    • ___ Drawer interior dimensions, not just outside dimensions
    • ___ Bin sizes available and whether you can buy singles later
    • ___ Divider options for small items
    • ___ Label method you will actually use, stickers, tags, clip-ons
    • ___ Stackability limits you can confirm by touching the display
    • ___ Anchoring or anti-tip option if you have kids or pets
      Action at the display. Try to wobble the assembled unit with one hand. If it rocks, picture it loaded.
      D. Materials and Maintenance
    • ___ Can you wipe it with a damp cloth without it staining
    • ___ Does it attract dust, rub your finger across a dark sample
    • ___ Will fabric items snag on edges
    • ___ Are parts replaceable, or is it “whole set only”
    • ___ Smell check for plastics if you’re sensitive, lean in and sniff
      That smell test feels awkward. Still do it.
      E. Checkout Double Check
    • ___ Count boxes against your list before you pay
    • ___ Confirm you have all hardware bags if they are separate
    • ___ Keep the receipt somewhere you can find in two weeks
    • ___ Take a photo of the SKU tags if returns are likely
      If you’re using this as a closet organizer checklist, don’t skip the checkout step. This is where missing brackets happen.

    Common Mistakes and a Better Next Step

    Mistake one. Measuring only the “big rectangle” and ignoring the weird bits. Closet rods are not centered. Baseboards shove units forward. Doors steal space.
    Fix. Get on the floor and measure at the baseboard line, not at chest height. Put the tape against the wall and press it flat.
    Mistake two. Buying containers before you decide what the containers are for. Then you own twenty shallow trays and none of them fit socks the way you fold them.
    Fix. Pick one category and test it. At home, fold five shirts your normal way. Stack them. Measure the stack height with your tape. Now you’re shopping with a real target.
    Mistake three. Over-building a system that only works on your best day. Perfectly labeled drawers. Tiny compartments. It looks sharp for a week. Then you get busy.
    Fix. Leave some slack. Plan one “junk buffer” bin on purpose. Put it low. When you catch yourself stuffing random stuff into a neat drawer, you’ll feel it and redirect.
    Mistake four. Ignoring how you actually move. If you always drop your keys in the same spot, a drawer across the closet isn’t a solution.
    Fix. Stand at your closet entrance and mime your routine. Shoes off, jacket off, bag down. Put the high-use zone where your feet already go.
    A good next step is small. Print the checklist, grab your tape, and do a five-minute pass tonight. If you only capture width, depth, and door swing, that’s enough to keep your shopping trip grounded. Then your modular choices become simple matching, not guesswork.

  • Before and After Transformations Using Basic Modular Drawer Systems

    Before and After Transformations Using Basic Modular Drawer Systems

    Why the “Before” Always Looks the Same

    We all know the feeling. You open a drawer, and it’s a chaotic abyss. Socks are tangled with t-shirts, cables are knotted like fishing line, and that one specific tool you need is buried at the very bottom. It’s frustrating. Usually, the “before” state isn’t just messy; it’s dysfunctional. You waste ten minutes every morning just finding socks that match. That’s dead time. Most people think the solution is buying a bigger dresser or throwing things away, but the real issue is often just the lack of structure inside the space we already have. A deep, empty drawer is basically a trap for clutter.

    The Mechanics of a Basic System

    You don’t need a custom carpenter or a expensive renovation crew. Basic modular drawer systems work on a simple principle: segmentation. Think of it like creating a grid. You take a wide, open space and break it down into manageable zones. Most systems use a mix of interlocking dividers, stackable bins, or adjustable trays. The “modular” part is key. If you buy a pre-made organizer with fixed slots, you’re stuck with that layout. But with a modular system, if your sock collection changes or you decide to store office supplies instead of underwear, you just move the pieces around. It’s flexible. Ideally, you want a system that fits the dimensions of your drawer exactly, so things don’t slide around when you close it.

    Real-World Transformations

    Let’s look at a kitchen pantry. Before the makeover, it was a disaster. Spices were lost behind boxes of pasta, and finding a specific can of beans meant pulling everything out. After installing a few modular drawer units with tiered steps and clear dividers, the change was instant. You can see every spice jar label at a glance. Nothing gets lost in the back.
    Now consider a bedroom closet dresser. The “before” was a pile of folded jeans that toppled over every time you grabbed a pair. By adding vertical dividers—essentially creating little shelves for each pair of jeans—the stack stays upright. You pull one pair out, and the others remain standing. It’s a small mechanical change, but it stops the daily annoyance of refolding clothes. The visual proof is striking: a drawer that looks calm instead of aggressive.

    What Actually Fits Inside

    This is where most people mess up. They buy organizers without measuring their actual stuff. You have to be realistic about volume. A standard modular drawer unit might look great on the shelf, but if your hoodies are thick, they won’t fit into a 4-inch high bin.
    Small items like batteries, pens, and charging cables need small, tight compartments. If you put a single AA battery in a large 6×6 inch bin, it will just rattle around and get lost again. Conversely, trying to stuff bulky winter sweaters into small segmented cubes is a losing battle. Compression helps, but you need the right container size for the job. Measure the tallest item you plan to store and ensure your drawer depth can accommodate it with a little bit of clearance. If it’s a tight squeeze, you’ll never use the system.

    Common Mistakes to Avoid

    The biggest trap is organizing before decluttering. If you install a fancy modular system and then fill it with junk you don’t need, you just have organized junk. Pull everything out first. Get rid of the expired coupons, the socks with holes, and the duplicate tools. Only then should you start placing the modules.
    Another mistake is over-complicating the setup. You don’t need a complex configuration for a junk drawer that holds random screws and rubber bands. A simple, broad divider or two loose bins will do the job. Don’t over-engineer it. The goal is to grab things without thinking, not to create a puzzle you have to solve every time you need a pen. Keep it simple. If the system feels like a chore to maintain, you’ll stop maintaining it within a week.

  • The ultimate list of modular storage tools that will save your sanity

    The ultimate list of modular storage tools that will save your sanity

    Why Fixed Shelving Is the Enemy of Sanity

    I have a genuine beef with built-in shelving. It looks great in the showroom, but six months later, your life changes, and suddenly that perfectly spaced cubby is useless. You buy a new pair of boots, and suddenly the shoe rack is a war zone. This is where modular storage tools come in. They aren’t just about being neat; they are about admitting that your stuff is going to change.
    Modular systems are essentially LEGOs for adults. You buy a frame, you buy some bins, and you arrange them. If you need more vertical space for tall vases in March, you move a shelf. If you need more horizontal space for sweaters in November, you move it back. It’s not rocket science, but it feels like a revelation when you stop trying to cram your life into a static grid. The best storage tools 2026 has to offer are all about this flexibility.

    The Mechanics of a Good Grid System

    Let’s talk about how these things actually work. Most modular systems rely on a few basic components: vertical tracks, horizontal brackets, and some sort of container or shelf. The magic happens in the spacing.
    I used to think wire racks were the pinnacle of organization. They aren’t. Small items fall through the wires, and the dust collects in ways that are genuinely upsetting. Solid surfaces are better. The real game-changer is the groove system—tracks that let you clip shelves in at any height interval. It sounds trivial, but that one-inch difference is the line between “this fits perfectly” and “I have to smash this down to close the door.”
    When you are looking at modular organizer recommendations, ignore the pretty marketing photos and look at the hardware. Does the bracket lock in place? Does it wobble when you touch it? If it feels flimsy in the store, it will collapse when you load it with books.

    Closet Organizer Products That Actually Work

    Closets are the usual victims of bad design. You get a single rod and a high shelf. That’s it. Modular closet organizer products fix this by doubling or tripling your hanging space.
    The most effective setup usually involves a “double hang” configuration. You hang a rod high up for long coats and dresses, and then drop a second rod below it for shirts and pants. It instantly doubles your capacity. But the real sanity-saver is the pull-out basket. I’m talking about those wire or fabric bins that slide out like drawers.
    Throwing socks into a pile on a shelf is depressing. Folding them into a slide-out bin makes you feel like you have your life together. It’s a small psychological win, but at 7:00 AM, you need those wins. Look for systems that allow you to swap out baskets for shelves later. You might want bins for socks now, but shelves for shoe boxes next year.

    Drawer Dividers Are Non-Negotiable

    If there is one modular tool I would fight for, it’s the adjustable drawer divider. Not the cute little plastic boxes that take up half the space. I mean the spring-loaded dividers that expand to fit the width of your drawer.
    Before I used these, my “junk drawer” was a black hole of batteries, cables, and takeout menus. Now, I compartmentalize everything. One section for charging cables, one for batteries, one for the random stuff I can’t categorize. It sounds rigid, but it’s actually freeing. You stop looking for things because you know exactly where the boundary is.
    The same applies to kitchen utensils. The “utensil crock” on the counter is fine, but it takes up counter space. A drawer with dividers keeps the spatulas and ladles hidden but accessible. It’s cleaner.

    Modular Storage Tools for the Kitchen

    The kitchen is where modular storage really earns its keep. Specifically, the pantry. The “shelf within a shelf” concept is brilliant here. You have a standard depth shelf, but your spice jars are only two inches wide. You are wasting six inches of depth behind them.
    A modular tiered rack or a pull-out platform lets you see the soy sauce hiding in the back. No more knocking over the olive oil to get to the hot sauce. It’s frustrating when you buy duplicates of things you already own just because you couldn’t see them.
    Refrigerators are another battleground. Modular bins for the fridge door—clear plastic trays that clip onto the shelves—can corral the chaos of condiments. It prevents the “avalanche” effect when you open the door too quickly. I don’t know why manufacturers don’t just build these in, but until they do, the aftermarket solutions are worth the twenty bucks.

    The Trap of Over-Organizing

    There is a dark side to this. I’ve seen it. You get sucked into the aesthetic of organizing, and you start buying cute bins before you even know what you are putting in them. You end up organizing your clutter rather than getting rid of it.
    Don’t buy a modular storage tool just because it looks good on Instagram. Buy it because you have a specific problem: “My shoes are piled on the floor,” or “I can’t find my tax documents.”
    If you aren’t careful, you’ll spend a fortune on acrylic boxes and still have a messy house. The goal isn’t to have the prettiest storage; the goal is to stop thinking about your stuff so you can get on with your day. If the bin is opaque and ugly but holds your winter gear perfectly, keep it. Function over feelings. That’s the only way modular storage actually saves your sanity.

  • Modular organizers versus custom closets finding the cheaper option

    Modular organizers versus custom closets finding the cheaper option

    Breaking Down the Basics

    Let’s cut through the marketing fluff. When you stand in a messy bedroom with a credit card in your hand, you aren’t looking for “storage solutions.” You are looking for a way to make the piles of clothes disappear without spending your kids’ inheritance. That’s where the battle happens: modular organizers versus custom closets.
    Modular organizers are the stuff you buy in boxes. They are wire racks, melamine shelves, and canvas bins that you mix and match like Lego. They are designed to fit the average closet, which is great if your closet is average.
    Custom closets are a different beast. A designer comes to your house, measures every weird angle, and builds a permanent shrine to your shoe collection out of solid wood or high-end laminate. It’s furniture that stays with the house.
    The distinction isn’t just about materials. It’s about how you buy it. One is a product you haul home in a minivan; the other is a service that involves consultations and installation crews.

    How the Pricing Actually Works

    I need to be blunt about the cost because showrooms are notoriously bad at giving straight numbers.
    For modular systems, you are paying for parts. A typical starter kit from a big-box store might run you $100 to $300. If you go high-end with a configuration from a container store, you could easily hit $1,000. But here is the thing: the price is transparent. You see the tag, you do the math.
    Custom closets are priced by the linear foot. This is where it gets scary. A basic custom install usually starts around $150 per linear foot and can skyrocket to $600 or more if you want real wood and fancy drawers. For a standard reach-in closet, that means you are looking at a minimum of $1,500, often much more.
    You aren’t just paying for materials. You are paying for the design time, the guy who drives to your house to measure, the installation crew, and the profit margin of the company. It adds up fast. If your budget is under $1,000, custom is effectively off the table unless you have a tiny, tiny space.

    The “Weekend Warrior” Trap

    Everyone underestimates installation. This is the hidden cost that wrecks budgets.
    Modular organizers are almost always DIY. You get a drill, a level, and a paper template. It seems easy. Then you hit a stud, or worse, you miss the stud. You realize your closet walls aren’t square (they never are). Suddenly, that 2-hour project turns into an all-day fight with drywall anchors.
    I’ve seen wire racks pull right out of the wall because someone overloaded them with winter coats. It’s frustrating.
    Custom closets include installation. The crew shows up, they build the thing in a day, and they clean up the sawdust. They handle the uneven walls and the baseboards. You are paying for that headache to go away. If you hate DIY, or if you rent your home and can’t drill holes, modular systems that hang from a clothes rod are your only safe bet. But if you own the place and are handy, you save a ton by doing it yourself.

    When Custom Wins the Value War

    There are situations where custom is actually the cheaper option in the long run, even if the upfront cost hurts.
    Think about vertical space. Standard modular kits are usually 6 or 8 feet tall. If you have 10-foot ceilings, you are wasting two feet of potential storage. Custom builders will stack cabinets all the way to the ceiling, giving you space for seasonal items that you only touch twice a year.
    Then there is the “weird room” factor. Older homes have closets with angles, pipes, and sloped ceilings that make standard racks impossible to use. You can try to jam a modular unit in there, but you’ll end up with awkward gaps and wasted corners. A custom system is built around those obstructions.
    If you are planning to stay in your house for ten years, the cost per use of a custom closet makes sense. It adds real resale value, mostly because buyers lose their minds over organized storage.

    Finding the Middle Ground

    You don’t have to choose between a wire rack and a $5,000 renovation. There is a sweet spot that most people ignore.
    You can buy “semi-custom” modular systems. These are high-end melamine units that you design online, but they ship to you in flat boxes. They are vastly superior to the wire shelving found in apartments. They look like custom furniture—drawer pulls, finished ends, adjustable shelves—but you install them yourself.
    Or, you can hack it. Buy a modular unit and pay a local handyman $200 to install it properly. You get the custom look without the custom price tag.
    The cheapest option isn’t always the one with the lowest sticker price. If you buy a cheap modular system that breaks in a year and you have to replace it, you wasted money. But if you buy a custom closet that requires a loan to finance, you might have over-invested in drywalled storage.
    Measure your space. Be honest about your DIY skills. If the walls are straight and your budget is tight, buy the modular kit and use a good level. If the room is awkward and you never want to look at a tape measure again, call the pros.